
Trust Wallet is now integrated with Maverick Protocol! To better educate Trust Wallet users about Maverick, here’s an educational blog with a step-by-step tutorial of how to make a swap and how to add liquidity to pools on Maverick Protocol.
What’s Maverick Protocol?
Maverick Protocol is a leading provider of smart contract solutions in DeFi, focusing on enabling projects to customize, automate, and incentivize liquidity effectively, powered by Maverick AMM.
Since launching in March 2023, Maverick has established a new paradigm for liquidity provision, offering projects customization and efficiency they can’t find anywhere else in DeFi. Maverick supports over 5% of the daily trading volume in DeFi with up to over 400% Capital Efficiency ratio. Maverick Boosted Positions have enabled a diverse range of leading LSTs, stablecoins and longtail token communities to bootstrap liquidity and defend their peg with maximum incentive efficiency.
How to Create a Trust Wallet Account
Follow this tutorial to find out how to create a Trust Wallet account (you can redirect readers to this article: How to Create a Multi-Coin Wallet).
How to connect to your TrustWallet from the Maverick dApp UI
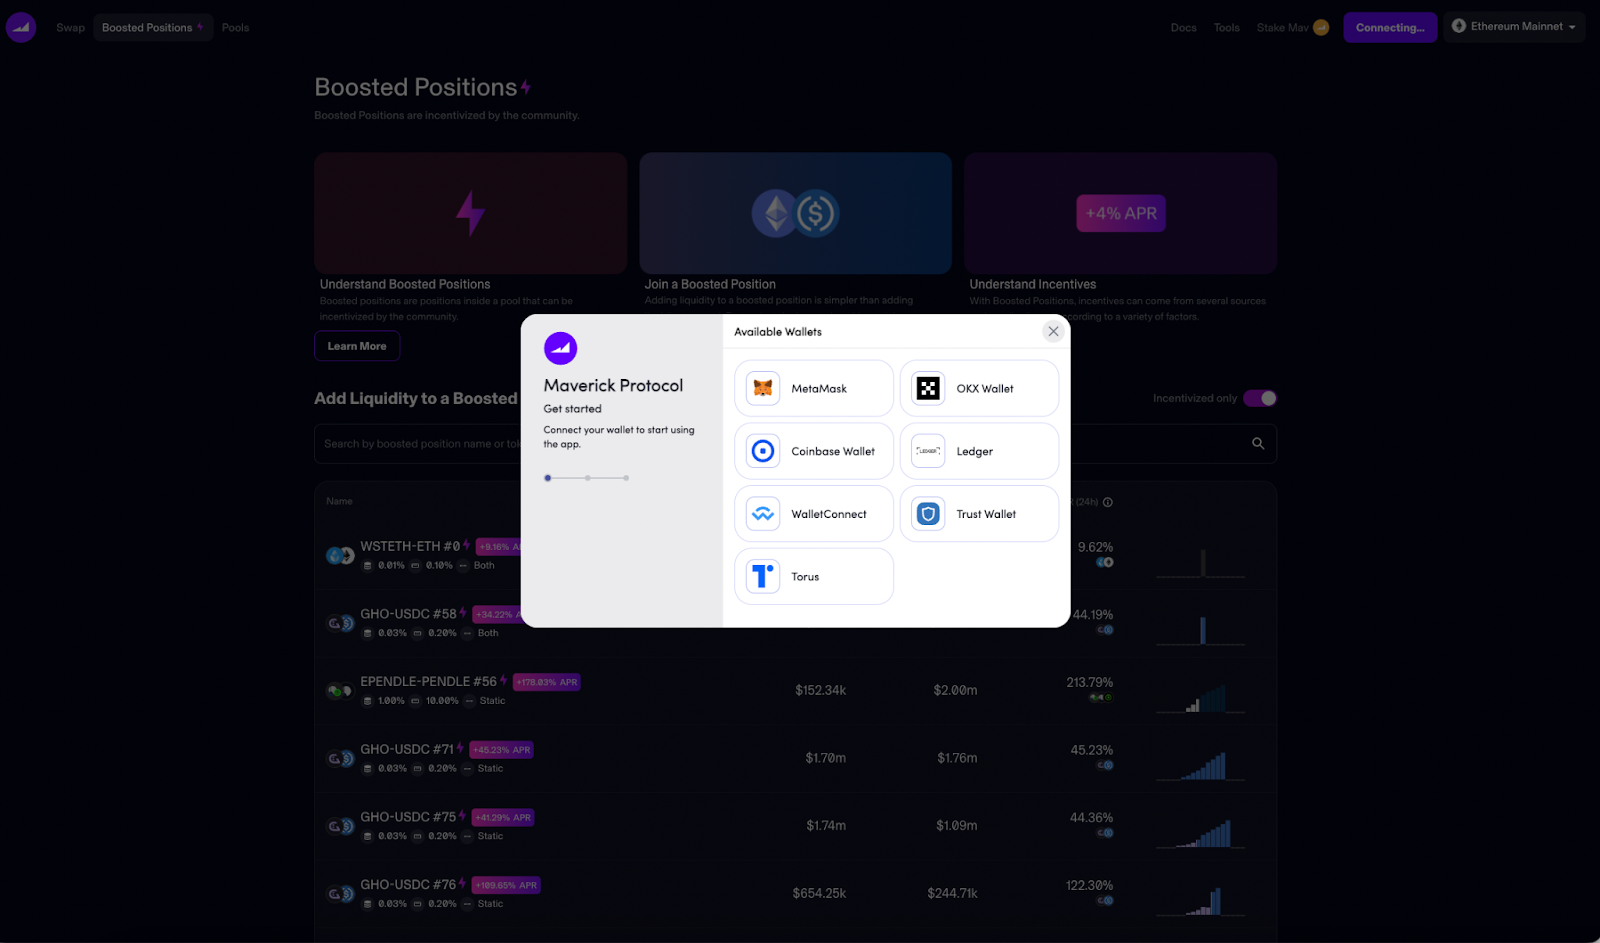
Once you have launched the Maverick dApp at https://app.mav.xyz, look for the Connect Wallet button in the top right of your screen. Click that button and select TrustWallet from the list of Available Wallets.
Step by step tutorial of the main features of Maverick Protocol
1. How to Make a Swap

The Maverick dApp loads the Swap page by default, but you can also navigate to it at any time using the menu in the top left. When you arrive at the Swap Page, you will see a window with two token inputs. The top one is used to indicate the token you want to trade on Maverick; the bottom one is used to indicate the token you want to receive in return.

Close-up of the Swap window.
Use the drop-down menus (1) to choose a token pair for your swap. You can use the arrow button (2) between the tokens to switch the direction of your swap quickly. The tokens available for swapping are limited by the pools currently deployed on Maverick.
You can use the numeric input (3) in the token inputs to choose the amount of tokens you want to swap. If you want to swap all of the token you hold, you can click the Max button (4) to choose the maximum amount you have available in your connected wallet. You will also be able to see the current balance (5) of each token that is currently in your wallet.
Once you have chosen your tokens and token amounts, the button will update to say Swap [input token] to [output token] (6) (so long as your wallet balance is sufficient to make the swap and the tokens have both been approved).
Please note, the first time you use any token on Maverick, you will be asked to Approve that particular token. UI buttons like Swap/Deposit will show as Approve [Token] until that token has been approved. Approving a token requires you to confirm the choice in a Metamask wallet pop-up. You may also need to set an appropriate spending allowance. Read more here.
Below the Swap button, you can find a summary of the details of your swap:
The price you are paying for your swap, expressed as how much output token you are getting for each input token
- The price impact of your swap on the pool
- The minimum amount of the output token you are guaranteed to receive in the swap
The AMM guarantees a minimum amount because there can still be fluctuations in the pool before you click the Swap button and send your transaction to the blockchain. But you can be certain you will receive the minimum amount if you choose to execute the transaction.
If you want to fine-tune the parameters of your swap, you can use the controls icon (7) in the top right of the window. This will allow you to select your slippage tolerance (i.e., how much drift from the quoted price you are comfortable with) and indicate how long you are willing to wait for the transaction to confirm before abandoning it.
If you are happy with the details of your swap, click Swap [input token] to [output token]. The UI will now ask you to review and confirm your swap.
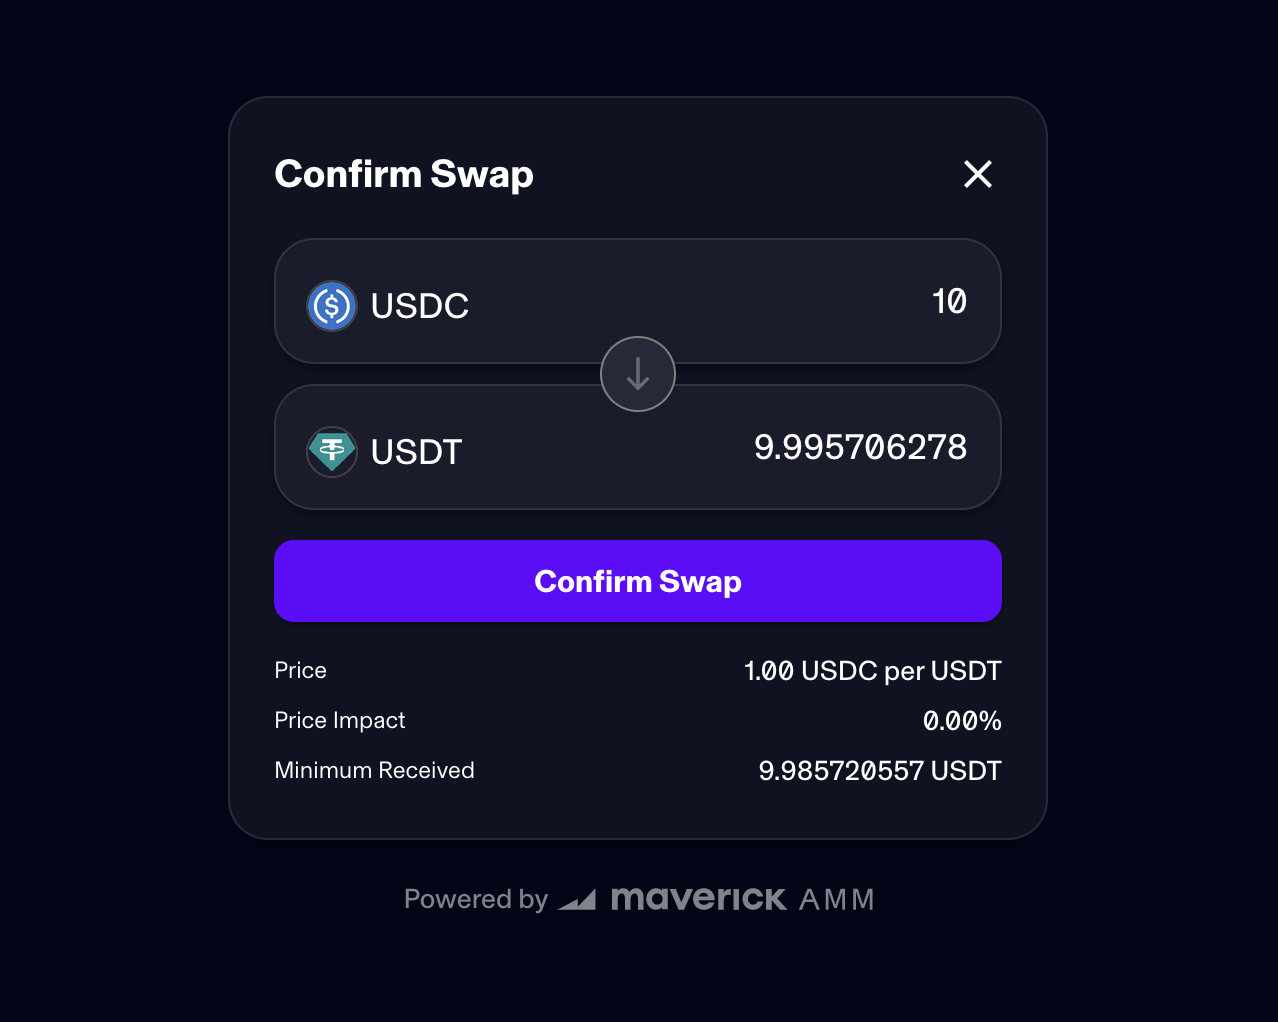
The Swap page asking for confirmation.
Clicking Confirm Swap will send a transaction authorization to your wallet. At this point, a pop-up window should appear asking you to confirm the transaction in your wallet. Click Confirm in this window, and it will close. After a short wait, you will see a green pop-up that reads “Swap Successful.”
Congratulations–you have completed your first swap on the Maverick!
How to Add Liquidity
This page offers step-by-step instructions on how to provide liquidity to a Maverick pool.
When you add liquidity to Maverick for the first time, you will mint a Maverick Position NFT. This NFT stores the details of all your liquidity positions on Maverick, and is used to manage and remove that liquidity. The wallet that holds a Maverick Position NFT controls the liquidity associated with that NFT. Do not transfer or sell your Maverick Position NFT unless you want to give control of the liquidity to another wallet.
Users add liquidity to Maverick using the Pools page, which can be accessed from the menu at the top of the screen. Adding liquidity consists of three steps:
- 1.Select Pool
- 2.Select Mode
Let’s look at each step in turn.
Select Pool
The Pools page.
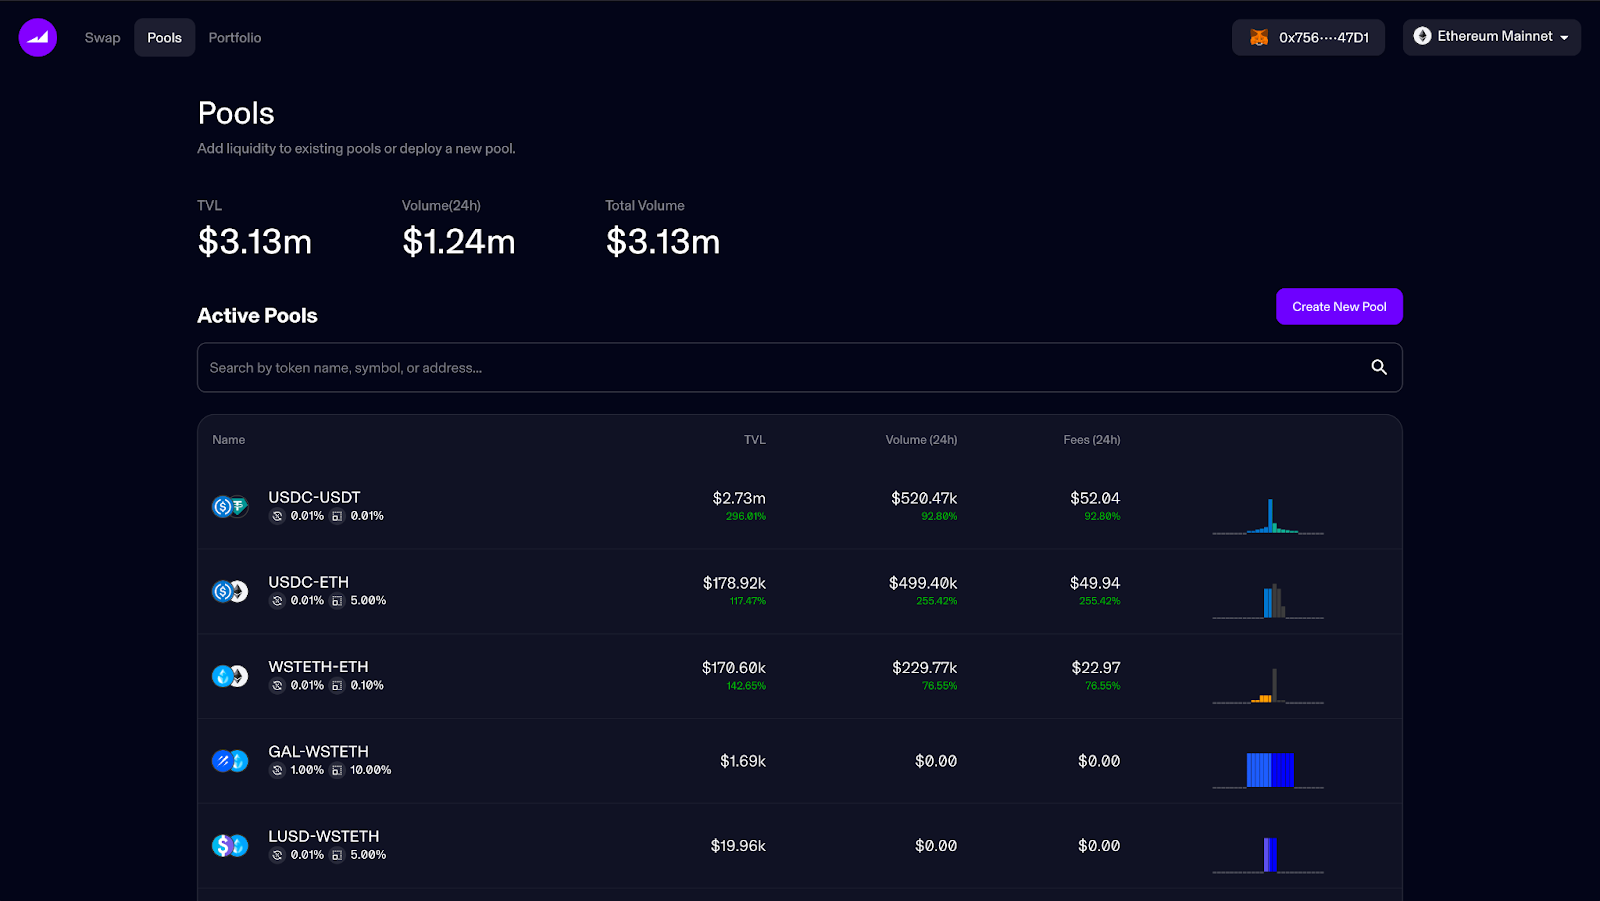
Once you have navigated to the Pools page, the first step is to select the pool you want to add liquidity to. The Pools page will present a list of pools that have already been deployed. You can choose a pool from this list, or click the Create New Pool button in the upper right to deploy a new pool. In this guide we’ll assume you’re choosing an existing pool from the list.
In order to add liquidity to a pool, you will need to hold at least one of the two pool tokens in your wallet. You can choose a pool from the list that includes tokens you already hold, or go to the Swap page to acquire tokens you will need for a pool.
The Select Pool page.
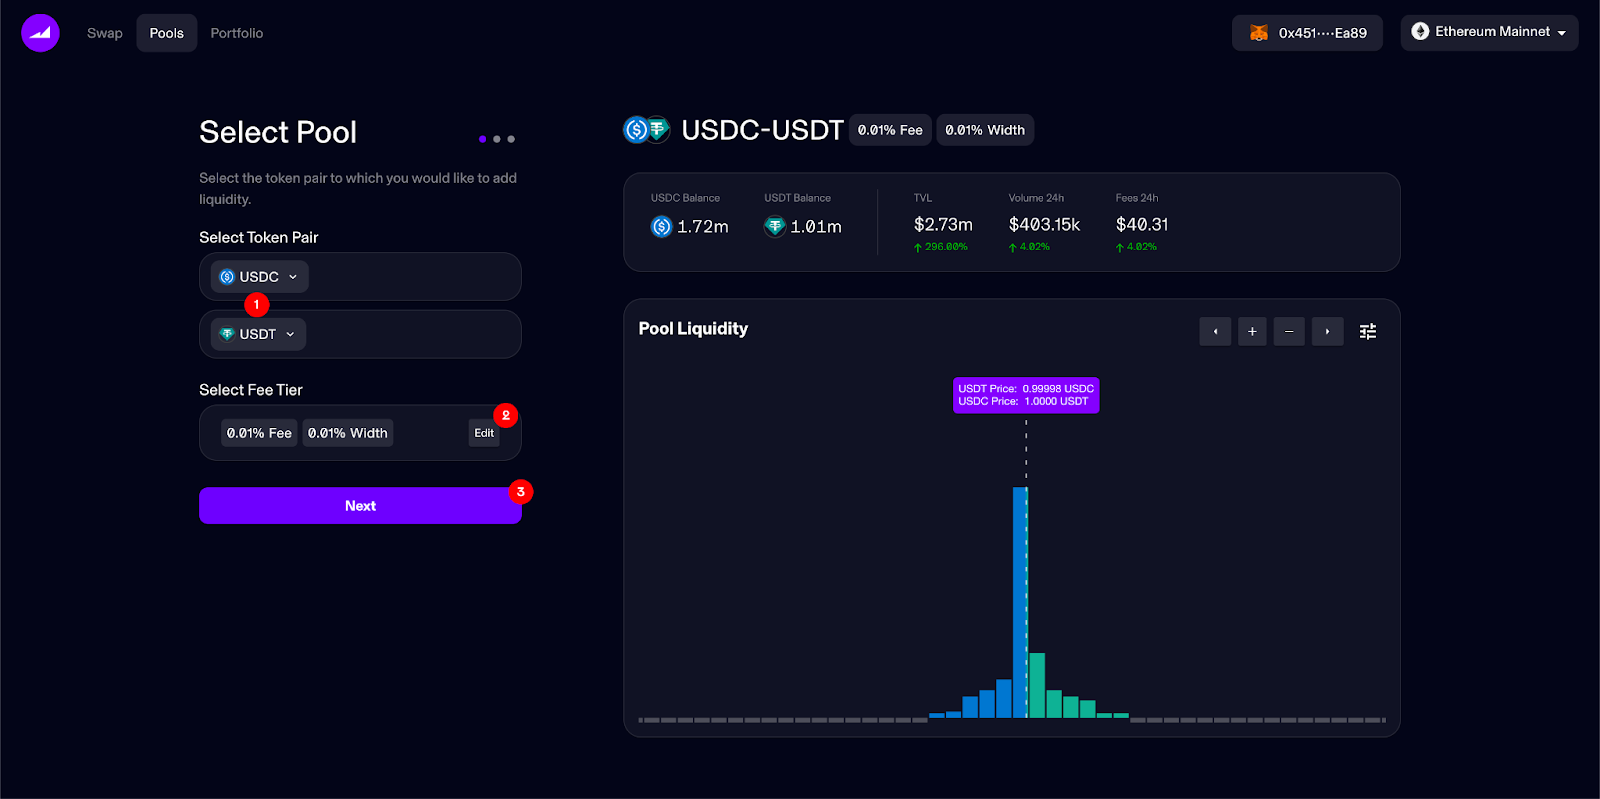
Click a pool will take you to the Select Pool screen. If you want, you can change the token pair you want to add liquidity to using the drop-down menus (1).
If you want to change the fee tier and bin width, you can click the Edit button (2). This will open a modal where you can choose between pools for the selected tokens based on fee tier and bin width.
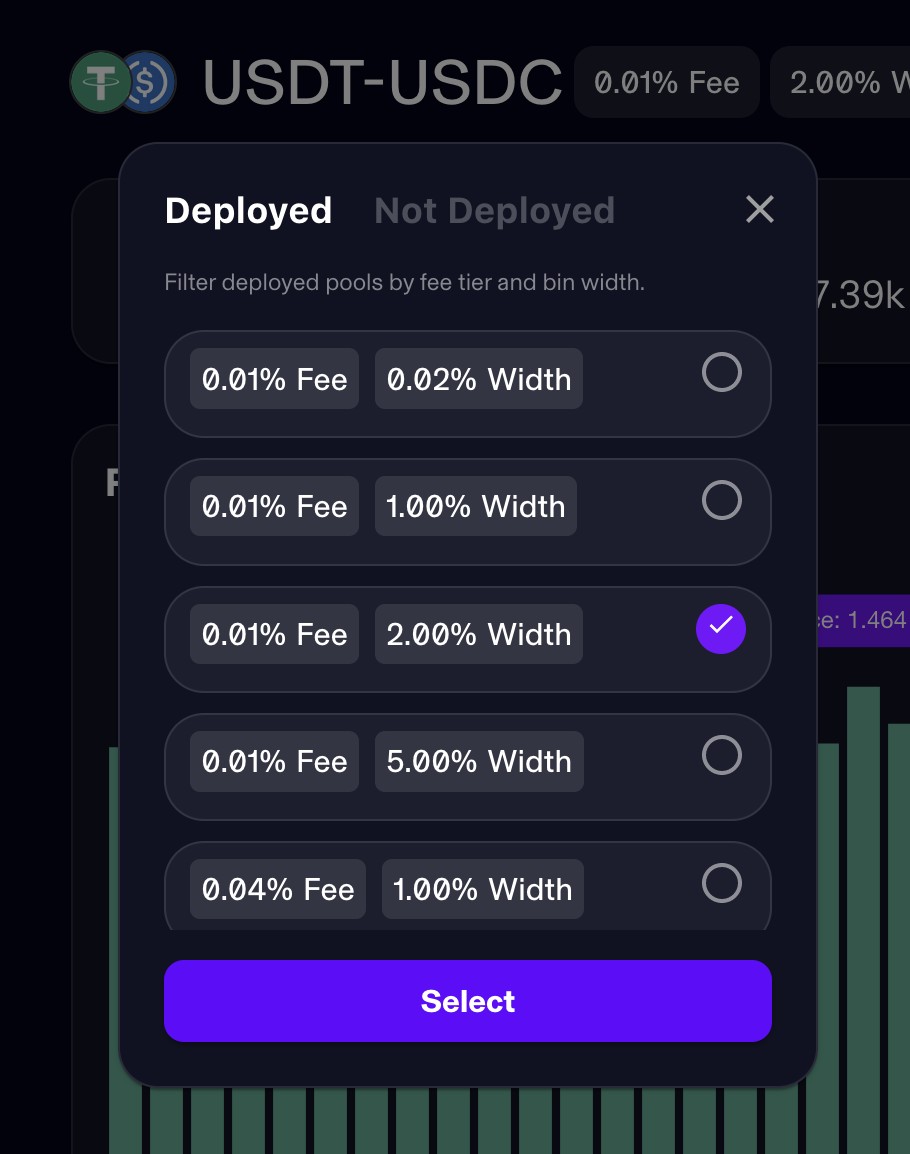
This modal lets you choose between pools based on fee tier and bin width. The checkmark indicates which pool you have selected.
The modal lets you choose between pools that have already been deployed and pools that are not yet deployed. If a pool is deployed, it means that at least one other user has added liquidity to that pool. Pools that are not deployed have no liquidity in them and therefore are not yet active. If you use this modal to select a fee tier and bin width that has not yet been deployed, you will have to deploy the pool yourself.
The UI will load information about your chosen token pair and fee tier in the windows on the right, including TVL, volume, and an overview of the current liquidity distribution in that pool. If everything looks good, click Next (3) to continue.
Select Mode
The Select Mode page.

On the next page, you can select the liquidity mode. If you haven’t already, now would be a good time to review Maverick’s guide to Understanding Modes. The Select Mode page presents a brief explanation of each Mode and accompanying video, but Maverick’s guide goes into a lot more detail.
Select the desired Mode for your liquidity, then click Next to continue. Alternatively, you can click Back to return to the Select Pool page and change your token pair and/or fee tier.
Add Liquidity
In the final step, you choose how much liquidity to add from your wallet, as well as how that liquidity will be distributed within the pool.
Maverick AMM provides a lot of options for configuring liquidity distributions. Here, we’ll walk through the basic mechanics for adding liquidity, starting with the three movement modes and then looking at Mode Static.
Adding Liquidity to a Movement Mode

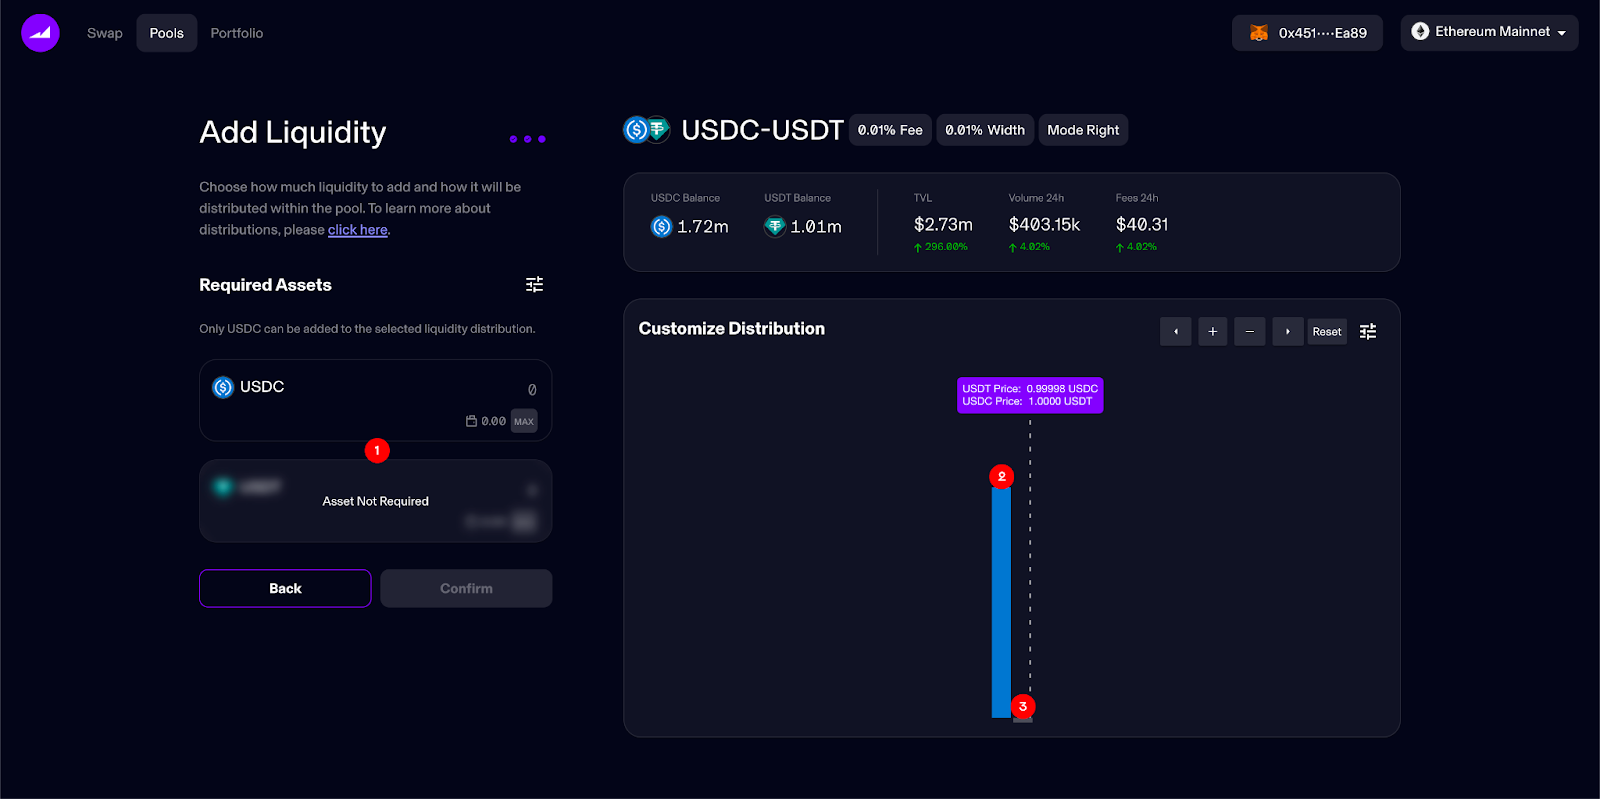
The Add Liquidity page, with Mode Right selected. Since the bin to the left of the active bin is selected, only USDC is required.
The screenshot above shows the Add Liquidity page after a user has selected Mode Right. The two token boxes on the left (1) are used to set the overall amount of liquidity you wish to add to the pool. These are interactive with the distribution chart on the right, meaning that the AMM will automatically compute the correct ratios of the two tokens required by your current distribution.
The default state for Mode Right is to add liquidity to the bin directly to the left of the current active bin. Since this bin isn’t active, it will consist entirely of the left/base token (here, USDC). This means that the current distribution will only require you to deposit USDC, so adjusting the amount of USDC in the token box on the left will have no effect on the other token box (here, USDT).
You can adjust the amount of USDC being added by grabbing the top of the bin (2) and dragging it up and down. Bin height corresponds to amount of liquidity in the bin, and as you move the bin heights you will see the amounts on the left change accordingly. Since the bin we’re looking at contains only USDC, changing its height will only change the amount of USDC to be added.
In Mode Right, you can instead choose to add liquidity to the current active bin. To do this, click on the tab for that bin (3) and drag it up. The active bin will contain both tokens, and so once it is active you will need to deposit quantities of both. In this example, if we activated this bin we would see the amount of USDT increase in the token box on the left.
The bins for the three movement Modes behave similarly, with these important differences:
- Mode Right: starts with bin to left of active bin, active bin can be staked as well
- Mode Left: starts with bin to right of active bin, active bin can be staked as well
- Mode Both: starts with active bin, bin to right and/or left can be staked as well
Once you have finished customizing the size and distribution of your position, you can click Confirm to continue.
Adding Liquidity to Mode Static
The Add Liquidity page, with Mode Static selected.
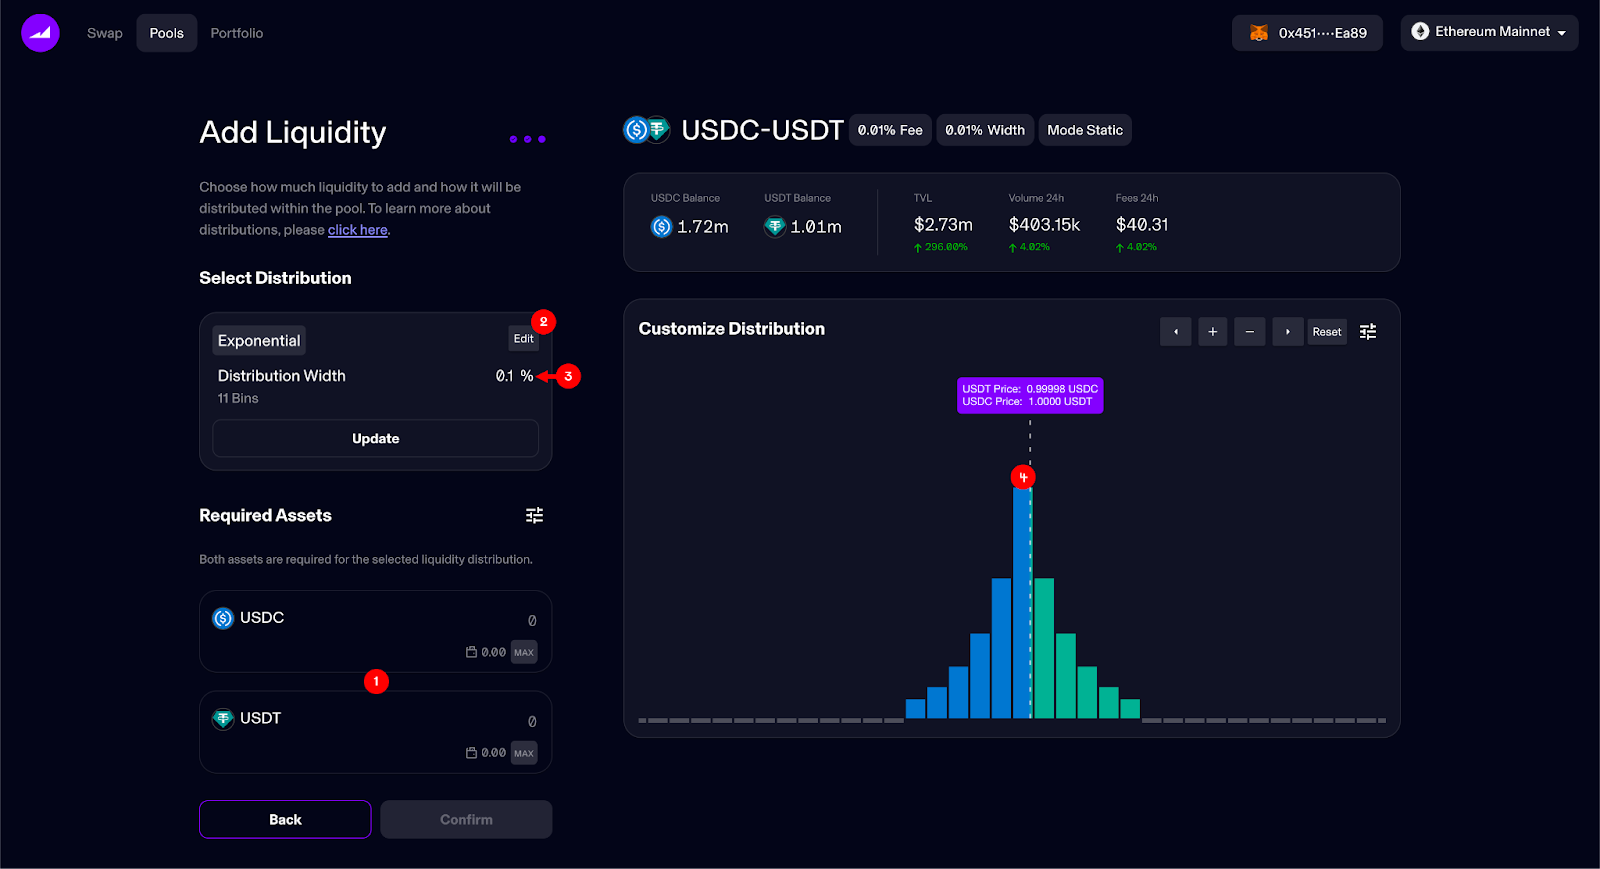
The screenshot above shows the Add Liquidity page after a user has selected Mode Static. The two token boxes on the left (1) are used to set the overall amount of liquidity you wish to add to the pool. These are interactive with the distribution chart on the right, meaning that the AMM will automatically compute the correct ratios of the two tokens required by your current distribution.
You can use the Edit button (2) in the Select Distribution section to choose an initial distribution model for you to use or customize. The options are:
- Exponential
- Flat
- Single Bin
You can also edit the Distribution Width (3) to change the overall width of your distribution across the pool’s price range.
You can tweak the shape of any of the distributions by clicking the top of a bin (e.g., at (4)) and dragging the bin up and down. Bin height corresponds to amount of liquidity in the bin, and as you move the bin heights you will see the amounts on the left (1) change accordingly. The active bin contains both tokens, so moving it will affect both token amounts. The bins to either side of the active bin are single token bins, so will only affect one of the tokens.
Once you have finished customizing the size and distribution of your position, you can click Confirm to continue.
Confirming Your Pool Transaction
The Confirm Pool modal.
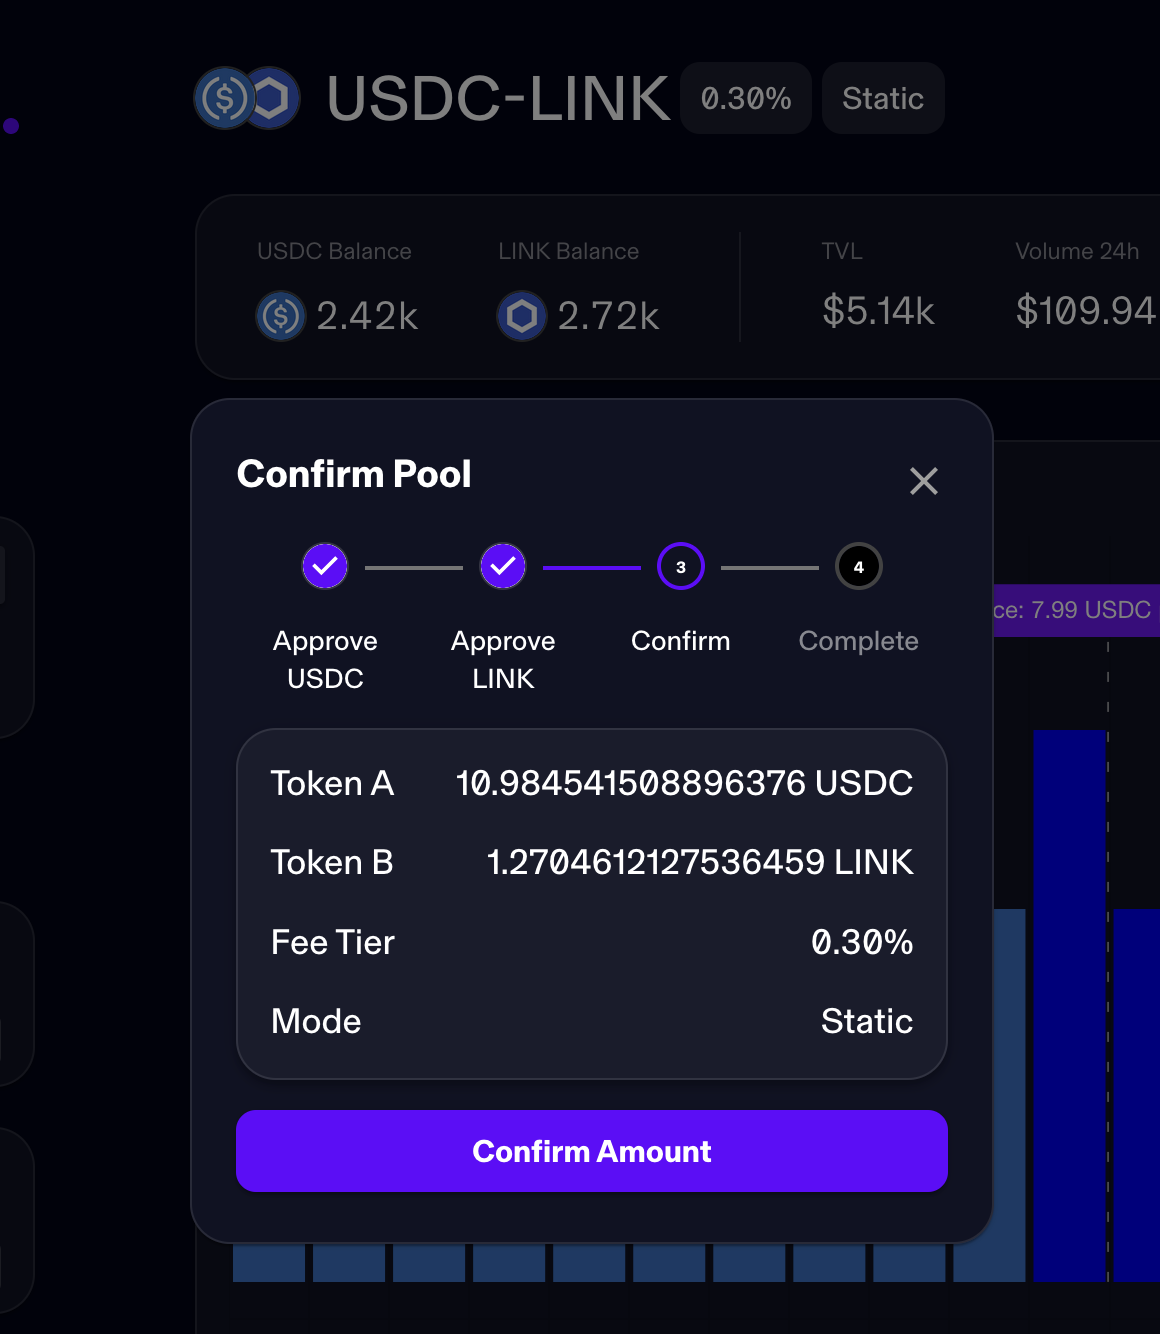
Clicking the Confirm button will open the Confirm Pool modal. This modal will walk you through the final steps necessary to add liquidity to the pool. If you have yet to approve either token on Maverick, you will first be asked to approve them. In the screenshot above, USDC and LINK have already been approved, so the modal has advanced to the third step.
The modal will present a summary of your proposed transaction, including the amounts of each token to be deposited from your wallet, the chosen Fee Tier for your pool, and the Mode you are using for your liquidity. If everything looks correct, click Confirm Amount to send the transaction to MetaMask for approval. If you need to edit something, you can click the X at the top right of the modal to return to the Add Liquidity flow.
If you click Confirm Amount, a pop-up window should appear asking you to confirm the transaction in your wallet. Confirm the transaction. After a short wait, you will see a green pop-up window that reads “Add Liquidity Successful.” You can now choose to review the transaction on Explorer or close the modal to be taken to the Portfolio page, where you can track all of your liquidity positions on Maverick.
You can also use Maverick to:
Find more tutorials in Maverick’s Docs: https://docs.mav.xyz/
Find Maverick Protocols on Socials
Website | Twitter | Discord | Telegram |Medium | YouTube
Disclaimer: The views and opinions expressed in this article are those of the author and do not necessarily reflect the official policy or position of Trust Wallet. We do not endorse any specific project mentioned in this article and are not affiliated with any of the projects or companies mentioned. The information provided is for educational and informational purposes only, and you are advised to do your own research before making any decisions.
Join the Trust Wallet community on Telegram Follow us on Twitter Instagram Facebook Reddit